Did you know that it is International Mountain Day? Well it is! This is a representation of one of my most favorite mountains, Mount Hood in Oregon.

This is a scene I truly would enjoy gazing upon . . . Mount
Hood in the distance with a few deer peeking out through snow covered
evergreens. I do get to see deer in my
yard on occasion hiding among the trees, and I can see mountains in my home
town, just not out my front window! So,
this is a fantasy scene created just for our Winter Window challenge over at Imagine. Learn how to make your own window frame using
a wood grain stamp, Tear It! Tape and Kraft cardstock to surround a
multilayered outdoor landscape.
Level: Intermeadiate
Time: 90 minutes
Step 1

Stamp foreground images in StazOn Saddle Brown on white
cardstock and die cut. Scribble Memento
Dual Tip Markers on craft mat along with a spritz of Ink Potion No. 9 and water
color images.
Step 2

Stamp Mount Hood image in StazOn Saddle Brown on 5” x 6 ½” Bristol
Board card base and water color. I
choose to use Pistachio and Olive Grove in the foreground and Danube Blue for
the sky. Most of the foreground will be
covered.
Step 3

Stamp woodgrain image in Memento Rich Cocoa on a 3” x 11”
section of Kraft cardstock. The image is
not designed to line up, so I used a Memento Dual Tip Marker to draw in lines
to finish the look.
Step 4

Trim Kraft cardstock into ¾” strips and score the back 1/8”
from each edge. Die cut the center from
Kraft cardstock trimmed to 5” x 6 ½” to make the supporting window frame.
Step 5

Apply Tear It! Tape to all four sides of the base frame. Fold edges of each section back on scored
lines trim to fit the frame. Adhere each
section to create window frame.
Step 6

Arrange and adhere die cuts to create desired scene. The background images are adhered directly to
the card base, the middle images have one layer of thin dimensional foam
adhesive, and the foreground images have two layers of thin dimensional foam
adhesive. Take care to avoid adhesive
around the edges where the frame will be placed. Trim images that overhang the scene.
Step 7

To add a bit of shimmer to the scene, color snow sections on
mountain with Versa Marker and heat emboss with Iridescent embossing powder. When I view snow-covered mountains from a
distance they seem to have a bit of a glimmer.
Step 8
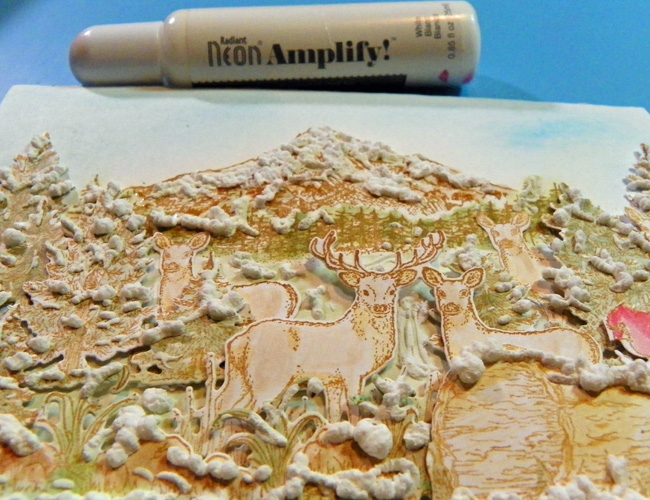
Add bits of Radiant Neon Amplify! on the scene to mimic a
light covering of snow in the foreground, and a snow topped mountain in the
background. Heat to cure and puff up the
Amplify! Adhere frame over the
scene.
Imagine
Other
Bristol Board
Kraft cardstock
White cardstock
Rainy Day Stamps—Mount Hood Large (Vintage, other similar
images available)
Heartfelt Creations—Woodsy Critters stamp & die set,
Woodsy Wonderland stamp & die set
Unity Stamp Company—Grainy Background
Elizabeth Craft Design—Stitched Rectangles
Fine tipped paint brush
No comments:
Post a Comment
I love to read your comments, they make me smile to know you enjoy my creativity! Thank you!